Showing posts with label cooking. Show all posts

Wednesday, 22 January 2014

Christmas Past

Happy New Year, kittens! It was a few weeks ago, but here are some photos from Christmas, when all I did was eat a lot and have marathon sessions of movie-and-TV-show-watching. 
A rather unfortunate gingerbread man fell into my coffee. 

We had homemade gingerbread biscuits for breakfast on Christmas morning, made with the recipe from The Hummingbird Bakery Cookbook. I like my gingerbread really spicy, so I always add twice as much ginger to the recipe when making. 

Friday, 21 June 2013

Sweet Potato and Purple Potato Gratin


No need to adjust your colour calibration - some of the potatoes here are indeed purple. If you need to impress anyone, this dish will certainly do it. The contrasting colours and rosette-like appearance pack a punch when brought to the table in its baking dish, and it looks more complicated than it really is. In fact, if you have a mandolin, it can all be prepared in mere minutes. Just be careful not to slice your fingertips off - nobody wants bloody fingertips in their portion of gratin.

The dish was inspired by two events in close succession - the discovery that our local supermarket sold purple potatoes, as well as our recent purchase of Ottelenghi: The Cookbook from a secondhand bookstall in Greenwich Market. Ottolenghi's version calls for just orange sweet potatoes, but I decided we could possibly do one better. If you can't find purple potatoes, than 50% normal potatoes and 50% percent sweet potatoes, or even 100% sweet potatoes, would do just as welll. 
Sweet and Purple Potatoes Gratin 
(adapted from Danielle's Sweet Potato Gratin in Ottolenghi: The Cookbook)

Ingredients
about 750gms purple potatoes
about 750gms sweet potatoes
5 tbsp sage (roughly chopped), plus extra for garnish
6 garlic cloves (crushed)
2 tsp coarse sea salt
1/2 tsp black pepper (freshly ground)
250ml whipping cream

Directions
- Preheat oven to 200 degree C. Wash the potatoes but leave them unpeeled. Slice them into discs roughly 5mm thick.

- Mix the potatoes, sage, garlic, salt and pepper together in a large bowl. Arrange the potato slices in a medium-sized baking dish by taking stacks of them and packing them next to each other*. Any any remaining bits of garlic and sage from the bowl to the potatoes. Cover the dish with foil and roast for 45 minutes. 

- Remove the foil and pour the cream evenly over the potatoes. Roast, uncovered, for another 25 minutes. The cream should have thickened by the end of the cooking time. 

- Garnish the dish with sage, and serve immediately. 

*I arranged the potatoes by placing them first along the outer ring of the dish, then working inwards, to create the rosette shape. There's no need to be too precious about placing the different colours one of top of the other.

Friday, 6 January 2012

Christmas!

It's taken a while, but I'm finally getting round to posting photos of my Christmas feast. We decided to have it at home this time, and celebrated it on Christmas Eve with the delightful Miss Kitty Valentine, my cushion-making partner in crime Aldona and her family.

In true over-the-top Polish tradition, our dinner consisted of at least 12 dishes (since I'm not actually Polish, I don't know if it is true that a Polish Christmas dinner has to include 12 dishes, it's just what I've been told.) 
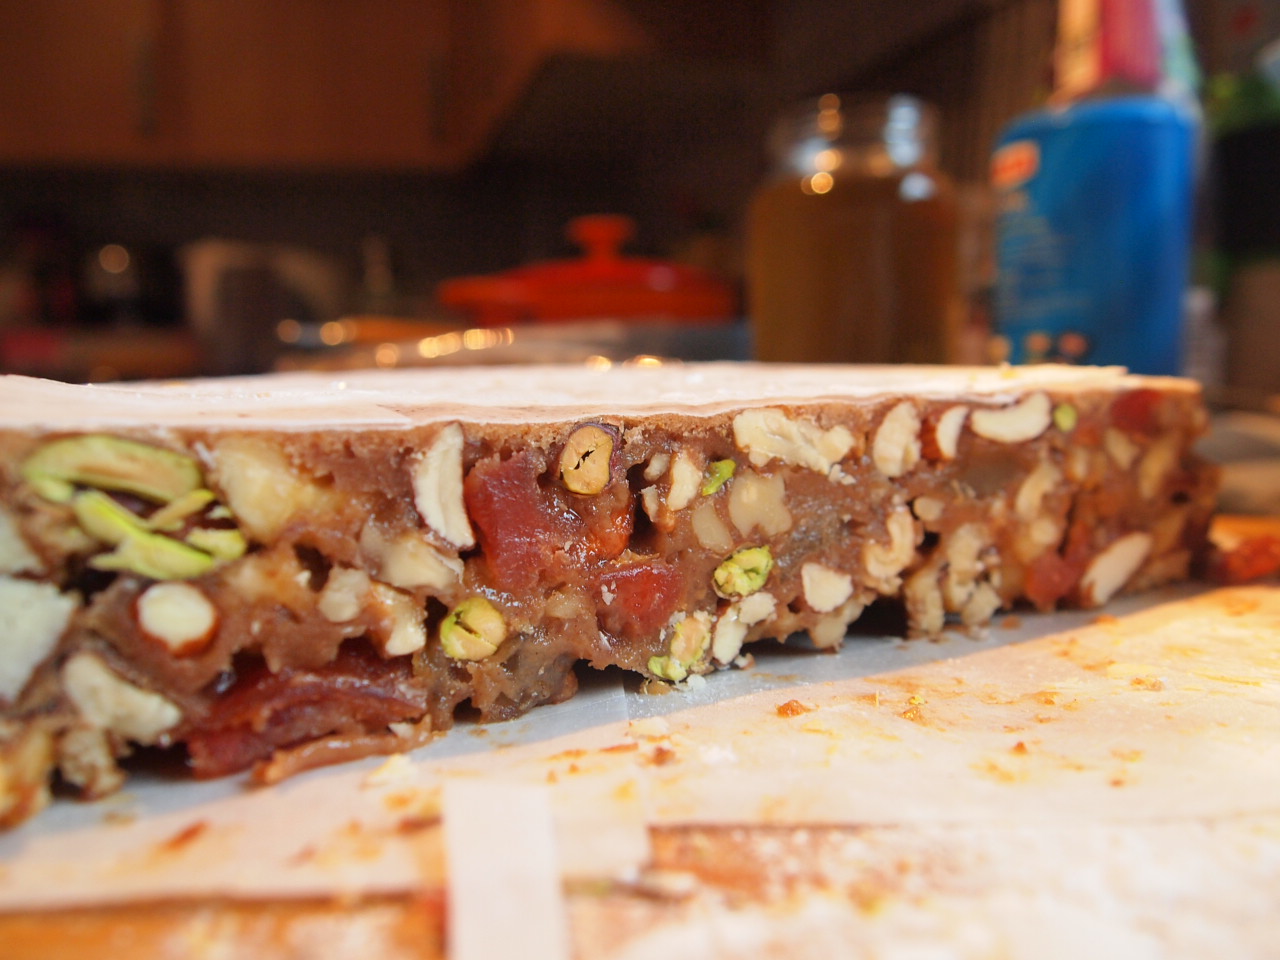
The coffee table had an array of sweets - (from top), homemade panforte, a quince, ginger and walnut cake based on this recipe, and some untraditionally shaped gingerbread biscuits (gingerbread T-rex, anyone?). Aldona also brought along some makowiec (poppyseed cake) and more biscuits.
The star of the night, a perfectly roasted goose! Manbacon (who can be partially seen behind the bird) cooked the goose himself, following a great recipe by the Hairy Bikers. He also managed to rustle up succulent salt beef, as well as plenty of delicious apple and pork stuffing. 

£10 notes to wipe our greasy hands and lips on, because we're hedonists and filthy rich. You can't see it, but we also had a stack of £20 and £50 note-napkins. 
Wild mushroom dumplings in beetroot soup (above), as well as some bigos, plenty of cured pork products, some marinated herrings, and possibly some other stuff as well. 
The aftermath - empty vodka bottles, half-finished bowls of soups and stews, burnt-out candles, crumpled napkins and wrapping paper, plenty of half-eaten food, and one stained tablecloth. Our guests were sent away with boxes stuffed full of food. 

Saturday, 24 December 2011

Cooking For Christmas - Candied Quinces

Regular visitors to this blog will probably be aware of my love of quinces by now. I strive to use them in a couple of recipes whenever they come into season, so I knew what I was going to do with them as soon as I read through this panforte recipe.

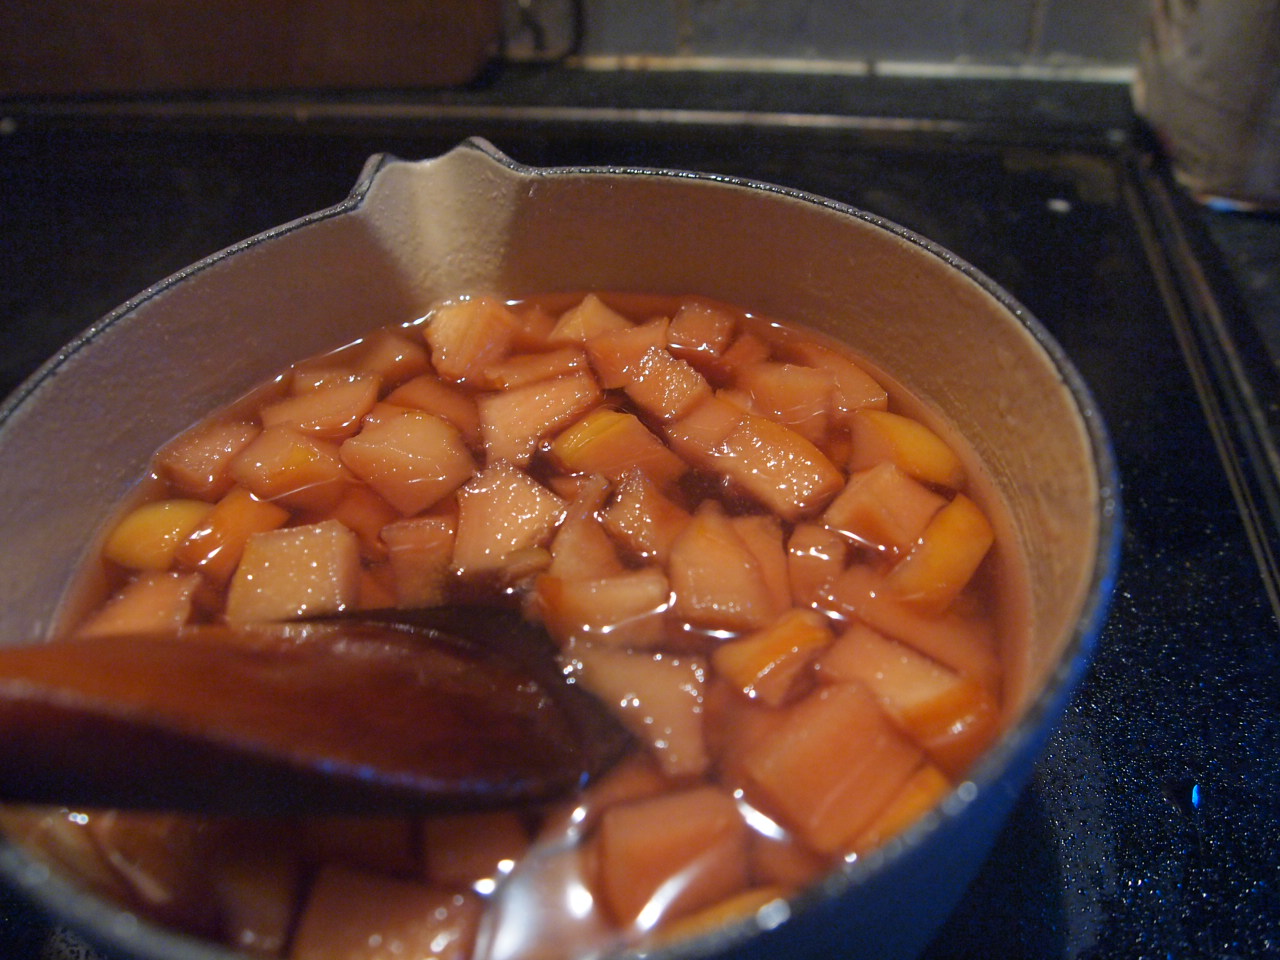
It does take a while to get the quinces candied to the right consistency, but it's not like you have to stand over them the whole time. Pop them on the hob and then go off and do what needs doing, but do remember to check on them every 10-15 minutes to see how they're going. *This is important, as I left my first batch for too long and they ended up burnt.* Once candied, they keep for up to a week, so you can always make them ahead of time too. 

The original recipe states that it only takes about 45 minutes to get them done, but I found that it took me about two hours to get them to the right consistency. I cooked mine low and slow to prevent the sugar from burning. 

Candied Quinces (from LA Times

Ingredients
1 1/2 cups water
1 1/2 cups granulated sugar
1 large quince
Directions
- Peel quince, slice in half and remove the core. Slice and cube the fruit into pieces roughly one inch wide and a quarter inch thick. 

- Combine water and sugar in a heavy-bottomed saucepan, and cook on medium heat until sugar dissolves. 
- Add cubed quince and reduce the heat to a gentle simmer, and cook until fruit is semi-translucent (the quince and syrup will turn a vivid shade of pinkish-red). 
Remove from  heat and pour into a heat-proof container. Cool, then store the fruit in the cooking syrup in an airtight container in the refrigerator. You'll have about 1 cup (8 ounces) of fruit.

Thursday, 10 November 2011

Cheese and Garlic Scones


Made some cheese and garlic scones this week by following Frugal Feeding's recipe. The original called for cheddar, but I only had Comte in my fridge and went with that. I accidentally on purpose grated more cheese than was necessary and topped the scones with it before baking them, for extra-cheesiness.

These are best eaten straight out of the oven, cut in half with dollops of butter melting on it. I had them for lunch just after I made them, but they are also pretty good as a snack when cooled down. 


Sunday, 14 August 2011

Fish Stew

Fish stew might be a bit of a misnomer, as this dish doesn't require the hours of cooking and er...stewing, that a traditional stew needs. It's more of a fish soup, prepared in little under an hour. The soup is enriched with some harissa paste and topped off with grated Parmesan for a spicy, thick texture. Sometimes you just crave a good helping of those piscine pals. 

Fish Stew (serves 4, or 2 very hungry people)

Ingredients
1 fennel
1 onion
2 medium tomatoes
1 tin of tomatoes (about 400gm)
6 cloves of garlic (more or less if preferred)
2 leeks
About 500gm of fish* (I used swordfish, tilapia, and cod)
half a bottle white wine
2 teaspoons chilli/ harissa paste
2 or 3 tablespoons grated Parmesan (or similar cheese)
parsley and basil, to garnish
Directions

- Cut your fish up into cubes and season them with salt and pepper. Set them aside for later. 

- Add some butter and olive oil to a pot on medium heat. Dice up your onion and garlic, and cook until soft and translucent. Slice up your fennel and leeks, and add that to the pot.

- Pour your white wine** into the pot - you can add more or less, depending on preferences. Dice and add the fresh and tinned tomatoes, then put a lid over the pot and let it stew about about half an hour. You can also add some fish sauce or salt to taste. 

- Check on your mixture about about 20-30 minutes. You should have a thick, red stew bubbling away now. Stir in your chilli/ harissa paste, place the fish on the top and cover it up with a lid. 

- Remove the lid after 10 minutes. The fish should be cooked through by now. Take the stew off the heat and ladle into bowls. Top with some grated Parmesan and garnish with basil and parsley. Serve with good, crusty bread!

* Shellfish such as prawns, and mussels, and even squid or octopus would work wonderfully in this dish.

**You can also use stock or even water in place of white wine.

You may have noticed some mushrooms in the photos here - I did use them last night because we had some we needed to finish up, but I wouldn't generally recommend them when making this soup as I don't think they add anything to it. 

Wednesday, 9 March 2011

Drekars

You know, I always thought I would make an excellent Viking. Okay, maybe not the pillaging and killing bits (what exactly does pillaging involve, anyway?) But the wearing-a-silly-hat-and-lots-of-(fake) fur bits, as well as the running-around-with-a-big-sword-and-yelling-a-lot bit - those bits, definitely!

But hang on, what's being a Viking got to do with baking? Well, Vikings were one of the things that sprang to mind as soon as I spied these shiny barquette moulds in an antiques shop in Rye.
The other thought that sprang to mind? Financiers, finally! I may not have married one (opting instead for the poor but handsome IT geek), but I can certainly eat them. You can make the little cakes in cupcake tins, but that somehow seemed just a little wrong to me, which is way I was beyond excited when I spotted the little plastic bag of little metal boats in the shop.

Anyway, the whole point of this rather pointless preamble is to tell that 'Yes, I made some financiers'. Then dressed them up and pretended they were little drekars that were invading my kitchen. 
So, yes, I spent my Sunday making tiny little flags and pretending I was a Viking. But, whatever. It was my Sunday, after all. You probably would have done the same if you'd had these shiny new-old barquette moulds in your possession. 

The recipe is simplicity itself, although it does take a little time to butter and flour all those little boats. I followed this recipe from the BBC Good Food guide, swapping out the 50g of raisins for 50g frozen blueberries instead. I'm told that the recipe came from Gordon Ramsey. In that case, old foulmouth might have made a mistake with his measurements - it supposedly makes 24 financiers, but I struggled to fill up 15 moulds. 

Then again, it could very well be my fault, what with me being a financier virgin and all. Whatever the case, these are definitely worth making - you're rewarded with a dense, moist cake that's rich with the flavour of browned butter and almonds. 

I'm still looking out for other financier recipes to try though, so do pass them this way if you've got a good one!

Friday, 25 February 2011

Hot Stuff

When I stumbled across this spicy tofu recipe by Yotam Ottolenghi last week, I just knew I HAD to try it. I happen to be one of those people that actually enjoy tofu (and don't you dare call me a hippy!), and this recipe also called for plenty of butter and spice - both of which I also happen to be a fan of!
Be warned though, this recipe is plenty spicy, so you'll need loads of white rice (and maybe a glass of water handy) to help diffuse the heat. We added about amount of pepper called for, and only used 6 chillies, and still ended up tearing and sniffling. Click here for the recipe.  


Thursday, 21 October 2010

Candied Pomelo Peel

The Manbeast and I have been a little pomelo-crazy lately, ending most of our meals by devouring at least a segment of this dino-sized grapefruit-ancestor. While the giant, juicy sacs were perfect for quenching an after-dinner thirst, the rind and pith, with the texture (and probably, taste) of building insulation, had to be binned. I didn't feel so good about chucking all that away though - surely, but surely, something could be done with it? 

A little digging around on Google, and I unearthed several recipes for making candied pomelo peel. I love candied ginger, so the idea of candying some pomelo peel sounded good to me. Here's the recipe I ended up using - Patricia Yeo's Candied Pomelo Peel. I've taken step-by-step photos too, for those of you who are interesting in trying it out. 
1. Fill a pot with water (I found it much easier using a large pot),  then bring it to a boil. Add the peel to the pot, and, after bringing the water back to a boil, let it boil for about 10-15 minutes. D
Drain the peel, discard the water and repeat this step another two times. This helps removes some of the bitterness, and makes the peel easier to remove.
You'll find that the pith has turned translucent after the first boiling. You can remove it then, or wait till after the third boiling.
2. Drain the peel, and try and scrap off as much of the pith as possible, leaving only the green parts. Cut the peel into thin strips (about 1/4 inch thick). Sorry, no pictures of this step, it's a two-handed job.

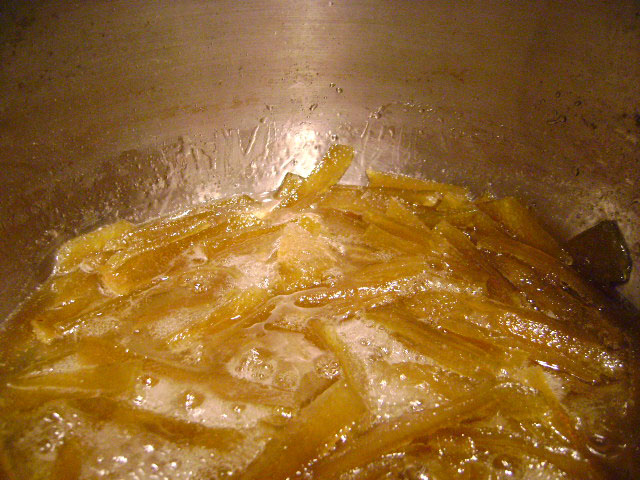
3. Add 500 ml water and 500 gm sugar to a pot. Dissolve the sugar in the water, bring the syrup to a boil, then add the peel and cook over a low heat for about one hour, until most of the liquid is gone. 
You can see in this photo how the peel has changed in colour, it looks translucent here. 
4. Okay, this bit takes a bit of coordination and concentration, you don't want to be burnt by hot sugar so be careful! Add about 200gm granulated sugar into a bowl or plate. Place a wire rack over a baking tray (to catch any drips), then remove a few strips of peel at a time and drop them into the sugar. Coat the strips of peel in the sugar, the place them on the rack to dry. Repeat until all the peel is used up, you may have to add more granulated sugar every now and then. 

I used a pair of tongs to pick up the strips, but then found it much easier using a pair of chopsticks instead. Try and persuade someone to help you here, so you can pick up the strips and drop them into the sugar, and the other person can do the coating and drying.
Let it dry overnight, then keep it in an airtight container, or put them into little cellophane bags and give them to friends. 

The candied peel have a slightly bitter aftertaste, which I really enjoy, but not everyone might like. I asked the Manbacon to test them out on his colleagues, and they all hated it because they found it too bitter for them. 

Friday, 8 October 2010

Love/Hate

A warning first - Marmite-haters, look away NOW! This post involves the usage and consumption of Marmite. 

I tend to approach cooking in much the same way I do most things - cutting and pasting, then crossing my fingers and hoping for the best. That was certainly the case when I hit upon my idea for this dish - roast chicken with a Marmite and treacle marinate. 

The marinate is easy enough to make up, but here's a recipe if you need it:

Marmite and treacle chicken
(for 6-8 pieces of chicken)

Ingredients
1 tbsp Marmite
1 tbsp treacle
half a lime

Directions
- Place chicken pieces in bowl or deep plate, add in Marmite and treacle, then squeeze the lime juice over it. Coat chicken in marinate and leave for at least 30 minutes.

- Preheat oven to 200 degrees Celsius. When it's preheated, place the chicken in a roasting tray, roast for about 30 minutes, or until chicken is cooked.
I sliced up a couple of leeks and placed them under the chicken pieces, so they were roasting with the chicken. You can add other vegetables, or cook your veggies any other way you prefer. You'll end up with lots of savoury, rich, slightly sweet gravy when you take the chicken out of the oven. I cooked some quinoa to go with my meal, and poured some of that wonderful gravy over it. 

So, tell me, are you a (Marmite) lover or hater?

Thursday, 2 September 2010

Been Cooking...


Pierogi - with my op-shopped dumpling press for perfect pleats everytime. My stumpy fingers are just not dexterous enough to form pleasant-looking, evenly-spaced pleats.

Orange, candied ginger and dark chocolate loaf, with a toasted coconut topping. We had visitors over for dinner about 2 weeks ago, and this was a last-minute, throw-everything-together experiment that worked. 

Scrambled eggs with mushrooms. 

Mac and cheese with cauliflower and bit of salami thrown in. Can you believe the Manbeast has never had mac and cheese before this? Sacre bleu!

Tea eggs - Hard boil some eggs, lightly crack the shells all over, then pop them into a pot, add a tea bag, star anise, cinnamon, ginger and a couple of teaspoons of soy sauce (or salt).
Simmer on low heat for half an hour to an hour, then let it soak in the mixture. It keeps for a few days, and always tastes better if you let it sit for at least a day before peeling and eating. 
Peel them and marvel at the pretty patterns, then enjoy.

Lime meltaways, from Not So Humble Pie's recipe. I left out the salt and green colouring, and I didn't dust them with icing sugar either. Because I'm a badarse in the kitchen.