Showing posts with label experiments. Show all posts

Thursday, 6 December 2012

Cranberry and Walnut Chocolate Muffin

No proper recipe yet - this is what happens when you wake up one morning and decide to throw some ingredients together. The result smells wonderfully chocolate-y, and weighs a ton due to amount of cranberries and walnuts stuffed inside. It came out rather dry though, which is why I'm going to redo it and add more moisture to it before I write down a recipe. A dollop of clotted cream on top certainly helps with the dryness though. 

Friday, 1 April 2011

Zesty Orange Crisps

Spring's arrival has brought with it a craving for orange. It could be because of the longer, brighter days, or it could my body telling me I need more vitamins - I'm hardly ever in the sun enjoying the longer, brighter days, after all (and my pasty, glow-in-the-dark legs are testament to that.)

Whatever the reason, I'm hardly one to say no to desserts, especially fruity ones. What to make this time, though? I'm not really a fan of orange-flavoured chocolates (sorry, Terry's) - I find them a little too cloying - and I just made an orange cake not too long ago. Well, how about biscuits then? A quick and impatient Google search didn't throw up many recipes that grabbed me, so I thought I'd indulge in an experiment instead. 

Orange Crisps

Ingredients
(makes about 40 biscuits)

150gm caster sugar
150gm butter, softened
225gm plain flour
1 tbsp vanilla extract
grated rind of 1 orange
2 tbsps orange juice

Directions
- Cream sugar and butter until fluffy. Add in vanilla extract, orange zest and juice.

- Stir in flour, knead mixture lightly, roll into a 2 inch wide sausage shape, wrap it in greaseproof paper or clingfilm and freeze for at least 30 minutes.

- Preheat oven to 175 C, and take the biscuit mixture out of the freezer. Slice off fairly thin pieces (I made mine about 3mm thick) and place them on a greased baking tray. Leave some space inbetween, as they will spread a little while in the oven.

- Bake for about 6-8 minutes, until lightly golden and remove from oven to cool.

At this stage, you can eat them as they are, or make a glaze to drizzle over them. I only made a glaze for them because I wanted to pretty up some burnt ones, so it's not strictly necessary, but it does help finish up the rest of the juice from your zested and squeezed orange.

Glaze
50gm icing sugar
2tbsp orange juice

Directions
- Mix icing sugar and orange juice until you get a runny consistency, then drizzle the mixture over the biscuits with a fork. Leave to set, then enjoy!

They can be stored in an airtight box for up to a week (if you can resist them for that long!).

Thursday, 6 January 2011

New Year


New Year's Eve was spent snuggled up in bed, feasting on homemade cranberry and marzipan pie, macarons from Laduree, and fizzy pink hibiscus-flavoured wine (cheaper and tastier than Buck's Fizz, but no more sophisticated). 

The pie was thrown together in a jiffy, in order to use up some leftover egg whites and bland shortbread. All you need are:
- some shortbread and butter (for the base)
- cranberries and marzipan (for the filling)
- and egg whites and sugar for the meringue.
Crush the biscuits and add butter to it, then place the mixture in the bottom of your pie tray. Cut up about 100gms of marzipan into bite-sized cubes, then add about the same amount of cranberries, and place them on top of the biscuit mixture. Make up your favourite meringue recipe, pour it over the pie and bake it. It's great on it's own, but a spoonful of plain ice-cream alongside never hurts!

It's not the most accurate recipe, but I wasn't taking note of the amounts I was using, because it was New Year's Eve and who can be bothered being pedantic with a pie on New Year's Eve?

Tuesday, 2 November 2010

Bleeding Ghoulies

While the cool kids were out trick-or-treating this past Saturday night, I was holed up in my kitchen, cackling in glee as I knelt in front of the oven. The reason? I was waiting for my little ghosties and jack-o'-lantern cakes to come out so I could devour them. (But the real reason is that I'm way too uncool to be invited to any Halloween parties, and I suffer from acute social phobia.)
These little cakes are an homage to the Satan cakes Googy and I used to bake while we lived in the Pony Club - so named because they were devilishly delish. They're gooey chocolate cakes with a spoonful of Nutella hidden in the middle, and a far cry from the sickly, vapid fairy cakes supermarkets tend to offer. 
I've been sworn unto death not to reveal the secret of Satan cakes, though, and these ghoulish cakes were the result of me throwing some ingredients together, so I haven't got a recipe for you. What this post is, instead, is a kind of 'how-to assemble your own bleeding ghostie cake'. 

The silicon ghost and jack-'o-lantern moulds came from Sainsburys, but it's not a big deal if you can't find them. You can always bake them as regular cupcakes, then draw scary faces on afterwards.

You'll need:
Ghost/ Jack-o'-lantern silicon moulds (if you can find them)
or
Cupcake liners
Your favourite chocolate cake recipe
Your favourite red jam (I used a raspberry conserve)
100gm white chocolate
50ml milk (I used vanilla-flavoured soy milk*)
1. Preheat your oven if needed, and grease the silicon moulds. Make up the chocolate cake batter.

2. Drop a couple of tablespoons of cake batter into each mould, then add a teaspoon (or 2) of jam on top. Add more cake batter until each mould is about 3/4 full.

3. Bake for time required. Remove cakes from moulds and let them cool.

4. Once cool, start preparing the white chocolate ganache for the top. Finely chop up the white chocolate, place it into a heatproof bowl and heat up the milk. Pour the milk over the white chocolate and stir until you get a smooth, homogeneous mixture. Pour or drizzle the mixture over each cake, leaving a thin layer of ganache on top. 

5. Try and wait til the chocolate cools before eating. Watch as they magically disappear into your tummy! Spooky!

*The combination of white chocolate and vanilla-flavoured soy milk makes the ganache taste like condensed milk. I'm a fan. 

Thursday, 21 October 2010

Candied Pomelo Peel

The Manbeast and I have been a little pomelo-crazy lately, ending most of our meals by devouring at least a segment of this dino-sized grapefruit-ancestor. While the giant, juicy sacs were perfect for quenching an after-dinner thirst, the rind and pith, with the texture (and probably, taste) of building insulation, had to be binned. I didn't feel so good about chucking all that away though - surely, but surely, something could be done with it? 

A little digging around on Google, and I unearthed several recipes for making candied pomelo peel. I love candied ginger, so the idea of candying some pomelo peel sounded good to me. Here's the recipe I ended up using - Patricia Yeo's Candied Pomelo Peel. I've taken step-by-step photos too, for those of you who are interesting in trying it out. 
1. Fill a pot with water (I found it much easier using a large pot),  then bring it to a boil. Add the peel to the pot, and, after bringing the water back to a boil, let it boil for about 10-15 minutes. D
Drain the peel, discard the water and repeat this step another two times. This helps removes some of the bitterness, and makes the peel easier to remove.
You'll find that the pith has turned translucent after the first boiling. You can remove it then, or wait till after the third boiling.
2. Drain the peel, and try and scrap off as much of the pith as possible, leaving only the green parts. Cut the peel into thin strips (about 1/4 inch thick). Sorry, no pictures of this step, it's a two-handed job.

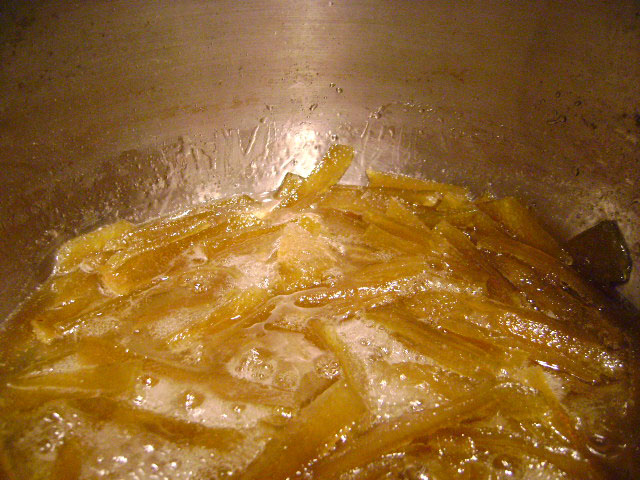
3. Add 500 ml water and 500 gm sugar to a pot. Dissolve the sugar in the water, bring the syrup to a boil, then add the peel and cook over a low heat for about one hour, until most of the liquid is gone. 
You can see in this photo how the peel has changed in colour, it looks translucent here. 
4. Okay, this bit takes a bit of coordination and concentration, you don't want to be burnt by hot sugar so be careful! Add about 200gm granulated sugar into a bowl or plate. Place a wire rack over a baking tray (to catch any drips), then remove a few strips of peel at a time and drop them into the sugar. Coat the strips of peel in the sugar, the place them on the rack to dry. Repeat until all the peel is used up, you may have to add more granulated sugar every now and then. 

I used a pair of tongs to pick up the strips, but then found it much easier using a pair of chopsticks instead. Try and persuade someone to help you here, so you can pick up the strips and drop them into the sugar, and the other person can do the coating and drying.
Let it dry overnight, then keep it in an airtight container, or put them into little cellophane bags and give them to friends. 

The candied peel have a slightly bitter aftertaste, which I really enjoy, but not everyone might like. I asked the Manbacon to test them out on his colleagues, and they all hated it because they found it too bitter for them. 

Thursday, 14 October 2010

Apple Cake

Recipe is a work in progress...and I left out the cinnamon (try not to bake when stressed). Adding cooked apples to the batter produces a lovely, moist cake. 

Friday, 8 October 2010

Love/Hate

A warning first - Marmite-haters, look away NOW! This post involves the usage and consumption of Marmite. 

I tend to approach cooking in much the same way I do most things - cutting and pasting, then crossing my fingers and hoping for the best. That was certainly the case when I hit upon my idea for this dish - roast chicken with a Marmite and treacle marinate. 

The marinate is easy enough to make up, but here's a recipe if you need it:

Marmite and treacle chicken
(for 6-8 pieces of chicken)

Ingredients
1 tbsp Marmite
1 tbsp treacle
half a lime

Directions
- Place chicken pieces in bowl or deep plate, add in Marmite and treacle, then squeeze the lime juice over it. Coat chicken in marinate and leave for at least 30 minutes.

- Preheat oven to 200 degrees Celsius. When it's preheated, place the chicken in a roasting tray, roast for about 30 minutes, or until chicken is cooked.
I sliced up a couple of leeks and placed them under the chicken pieces, so they were roasting with the chicken. You can add other vegetables, or cook your veggies any other way you prefer. You'll end up with lots of savoury, rich, slightly sweet gravy when you take the chicken out of the oven. I cooked some quinoa to go with my meal, and poured some of that wonderful gravy over it. 

So, tell me, are you a (Marmite) lover or hater?

Monday, 4 October 2010

Muesli Treacle Muffins

 The Manbeast isn't very good at starting his day with breakfast, so I thought I'd make things easy for him but baking up some easy-to-grab muffins. The inspiration came from a box of fantastic oat and treacle biscuits we picked up from Sainsburys - rich, sweet but with enough oaty goodness in it to let it pass as 'healthy'.
 These little muffins are stuffed with muesli and moist with olive oil - I wanted to produce a handsized, edible battery for busy mornings. 

Muesli Treacle Muffins
makes about 10
Ingredients
200 gm self-raising flour
100 gm muesli
2 tbsp treacle 
100 ml olive oil
100 ml milk 
2 eggs

For topping
1 tbsp demerara sugar
25 gm muesli

Directions
- Preheat oven to 175c. Mix flour and muesli in a large bowl, then add treacle to mixture.

- In another bowl, milk olive oil, eggs and milk. 

- Add the wet ingredients to the flour/muesli mixture, and stir it all up with a spoon until it's all combined. 

-Spoon the batter into muffin cases, sprinkle muesli and sugar on top and pop it into the oven for about 12 - 15 minutes.

-Enjoy! Keep them in airtight containers and they should last for up to 3 days without drying out. These would be sooooo good with some clotted cream too. 

Tuesday, 21 September 2010

Bake Club

Last week turned out to be a bit of a bake-athon. I whipped up some chocolate acorn caps and brioches on Thursday,  then hiked over to the East-side for Bake Club. The cake for this session was a moist, slightly savoury pistachio and fig cake, topped with a luscious layer of cream cheese frosting. I won't write too much about it, since Yusuf will do a write-up on our club blog soon enough. If you do want a go at it yourself though, click over to this DesignSponge page for the recipe. 

Bake Club was held in Yusuf's flat this time, and it is ridiculously PERFECT for food photography - clean white surfaces, lots of windows letting in natural sunlight! I'm gonna have to look for a flat like that the next time I move. Who cares if I have to sell a vital organ to pay the rent?

Sunday, 19 September 2010

Chocolate...Drops?

It's been a while since my last (and first) attempt at making macarons, and I've been raring to have another go since I received a new set of piping tips off eBay. So, I aged the egg whites, decided on a recipe (chocolate macarons with chocolate ginger cream cheese filling) and set off on my new mac-adventure! 

Since it was only my second attempt, I thought I'd stick with what I used before, and only tweak it a bit, instead making it all up on the spot like I sometimes do. So, I dutifully followed the same Serious Eats recipe I used the first time, swapping out 50 grams of icing sugar for 50 grams of dark chocolate. That's when things went downhill. 

The mixture smelt great, but looked somewhat solid...In fact, the circles I'd piped out reminder me of another kind of solid...
This little guy was saved from the op-shop, only be to subjected to this indignity. I bet he wished he was in the sticky maw of some chubby little kid right now. 

URGHHH! 

Still, it was getting late, I was getting grumpy, so I set them aside to 'cure' for a couple of hours, all the time crossing my fingers and hoping they would somehow magically smooth out and turn into perfect little discs. My kitchen was starting to resemble a midden.

After curing, into the oven they went (without their equine companion), for 8 minutes.

And look, no FEET! Where are the bloody feet? They look more like little acorn caps! Cracked, ploppy acorn caps. Whatever! I needed some sugar anyway, so I charged ahead with the filling. If anyone is interested, it's 100 grams of cream cheese, 3 tablespoons cocoa, 75 grams icing sugar and a couple of teaspoons of ground ginger, all mixed together.

Look at them! Little chocolate acorn caps. They didn't actually taste as disgusting as they looked though, so I guess it was worth it after all. The heavy batter actually made them taste like little round brownies, while the ginger adds a bit of spice to even out the sweetness. 
I wonder if I can get away with describing them as 'rustic' or 'shabby-chic' macarons?

Monday, 12 July 2010

Finders Keepers


Coming soon - lots more Keeper necklaces, made with cotton thread from my various dyeing experiments.

Monday, 28 June 2010

Experimental Banana Bread

The two ripe bananas sitting on my kitchen counter last week were starting to piss me off*, and I knew I had to do something about them before they rotted away. And the tastiest thing to make with over-ripe bananas? Banana bread, of course. Since I'd just spent all week on the computer, I wasn't really in the mood to go search for a new recipe to try out.

So, I made up a recipe instead. Although it says banana 'bread',the method is actually partly bread, partly cake-ish. I used yeast, and mixed it with plain flour instead of bread flour, just because I wanted to find out how that would turn out. Also, just like bread, I left it to rise for quite a while, although there isn't any kneading involved because the batter turns out very wet. The yeast feeds on the sugars in the bananas, and rises to form a bread with a chewy texture. This recipe uses hardly any butter, and no eggs, so it might be worth trying if you're worried about your waistline but still want to indulge in some sweets (please note the 'healthy' factor completely flies out the window if you're smothering it in Nutella). 

Banana Bread 
Ingredients 
1 tbsp dry yeast
150 ml tepid water/ milk (I used a mixture of both)
2 tsp sugar

250 gm plain flour
50 ml water/milk
50 gm butter
100 gm brown sugar
2 ripe bananas, roughly mashed 
ground cinnamon (to taste)
ground nutmeg (to taste)
25 gm walnuts (optional)
1/2 tsp pandan essence/ vanilla extract (optional)

Directions
- In a large bowl, dissolve 2 tsp sugar in tepid water/milk, add dry yeast and stir it around lightly. Cover with a cloth and leave it to rise for about 15 minutes.

- When yeast is activated, whisk in brown sugar, then add the flour, cinnamon, and nutmeg. Add the rest of the milk and the pandan essence to the mixture, and stir in the walnuts. 

- Add butter, and finally, the mashed bananas, and, using a wooden spoon or spatula, stir the mixture for about 5 minutes. This is to ensure the bananas get incorporated into the mixture and aren't just left on the sides.

- Cover the bowl with a damp cloth and let the batter rise for about 2 hours. Lightly grease a 7-inch baking tray (you can use other sizes too, just remember to adjust the baking times) and pour the batter into it. Then, cover again with a damp cloth and let it raise for another hour.

- Preheat the oven to 175c, then bake your bread for about 45 minutes, or until a skewer inserted inside comes out clean.

- Let it cool down, slice and enjoy! You can keep it for 3 or 4 days, and it's great toasted, since you get to enjoy crunchy outsides and soft, chewy innards.

Happy baking!

*I love eating bananas, but only when they're still slightly raw. The insides of my mouth feel gross and slimy and furry when I eat ripe/over-ripe 'nanas. Euuuech!

Friday, 14 May 2010

Dyeing With Spring

Finally got around to take some photos of the fabric and threads that I was experimenting with in this post, and here are the results. 
These are all mercerised cotton thread, like the kind used used for crocheting. They were soaked with (from left to right) daffodils, dandelion stems, dandelion flowers, and fennel leaves.

As you can see, the daffodils gave a really vibrant yellow, I'm completely in love with that colour!

The fabric I used here is a very luxurious silk-linen blend, from a pair of trousers in my scrap fabric pile. From left to right: dandelion stems, dandelion flowers, and fennel leaves.

This are my favourites, from the daffodil jar. Look how vivid the colours are! The fabric on the left is a polycotton blend, I think, and I folded it in accordion pleats to fit it into the jar, and it came out with this awesome stripey, tie-dye effect, I love it! The other piece of fabric is the same silk-linen blend as above, and I  simply crushed it up and pushed it into the jar, which may be why the colour is much more uniform.

I've also just started another jar two days ago, with more of that silk-linen blend, and a whole bunch of fennel leaves, so we'll see how that turns out in a week or so.

Friday, 30 April 2010

Greens and Yellows

More dyeing experiments with (from top) fennel leaves, dandelion stems, and daffodil flowers. I also had a second jar of dandelion flowers on the go at the same time, but they're not pictured because I've taken pictures of those before.


The fabric and threads are currently mordanting (is that even a real word?) in alum, salt, or a mixture of both, so I'll post photos of the final results when they're dry. Just a word of warning to anyone attempting something similar - fermenting flowers smell worse than the Devil's own gunk after 5 days in a jar, so PLEASE hold your breath when opening the jars up. 

Also, for anyone interested in home dyeing with natural ingredients/materials, I highly recommend a visit to the beautiful Tinctory blog for some inspiration. 

Thursday, 29 April 2010

Swatches

Here are the results from the solar dying experiments I did last week. I left these in a jar for about 5 days, then rinsed them out and dried them.
Mercerised cotton thread soaked in (from left): strawberry, raspberry and loganberry tea infusion, forsythia flowers, and dandelion flowers.

I was pleasantly surprised at how vivid the yellow turned out to be from the forsythia pot, the colour looked fairly weak when it was soaking. 

From left: polycotton in strawberry, raspberry and loganberry infusion, linen in same, polycotton in dandelion flowers brew, and linen in forsythia brew.

The first two pieces of fabric on the left don't seem to have absorbed any of the dye at all, and the other piece of polycotton has been dyed a very faint yellow hue, although it just looks dirty here. And again, the linen soaked in forsythia came out in a fairly strong shade of yellow. I wish they were still flowering so I could gather them up and try and obtain a stronger shade of yellow, but sadly, all the bushes around here seem to have shed most of their flowers.

But I have got four other pots on the windowsill right now, and I will post results when I rinse and dry out the swatches.