Showing posts with label DIY. Show all posts

Friday, 28 September 2012

Cards

I made some any-occasion cards.
All handmade and one-of-a-kind, they have been left blank inside so you can include your own messages. These and more will be available at my stall in the Tea Rooms, Brick Lane, every Saturday and Sunday. 

Thursday, 8 December 2011

Winging It - Refashioned Man's Shirt

Men's shirts can be rather boring, can't they? I have a number of them laying around, thanks to Manbacon. The worn out ones have been turned into rags, but those in good condition are great for quick refashioning projects. 

For this blouse, I started by taking apart all the seams of the original shirt, so I was left with a number of flat pieces of fabric. I then traced out a bodice pattern and re-sewed the blouse, turning it around so the buttons were on the back.
The shirt cuffs and collar came from a rather baggy 1980s dress I'd cut up a few months ago. It was going to be a sleeveless top so I had no real need for the cuffs. However, I decided to stick them on the shoulders of the blouse in a fit of fancy. Voila, wings! Or wing-like structures...
The collar turned out to be that bit too small for the neck of the new blouse ('measure twice, cut once' evidently not one of my favourite phrases). I got around the problem by attaching a length of vintage seam vintage to each side of the collar to function as ties.

And there you go - an easy refashioned blouse!
Blouse - refashioned, skirt - selfmade (available on Etsy), 

Sunday, 28 February 2010

Recycled Padded Envelopes - A Tutorial

If you're like me and do a fair bit of wheelin' and dealin' on the interwebs, you probably end up with lots of used, padded envelopes piled up precariously too. The little recycled padded envelopes shown here can be made in various sizes, don't take much time to whip up, and won't cost you any money at all!

You'll need:
Large padded envelopes
Scissors (DO NOT use your best fabric scissors!)
Glue (I used Copydex, nut you can use any kind of paper glue) 
Scrap paper (Magazines, catalogues, wallpaper, newspaper etc)
Sewing machine
Thread
Sewing needle (if you haven't got a sewing machine)

Here we go!
1) You'll need to transform this huge padded envelope (above) into this (picture below). Start by splitting the front and back of the envelope apart, so you get 2 pieces of padded goodness. Then, fold the separated parts into halves or quarters, depending on the size you want to end up with, and cut them up into into 2 or 4 parts. Those will be the front and back bits of your new and improved, little padded envelopes. Trim the bit that you'll use as the back so it's about an inch shorter than the front - this way, the longer portion forms a flap that you can simply fold over and tape when you need to post something.

2) Still with me? Ok, good. Now, get the scrap paper that you want to use on your envelopes, and trim them so they're just slightly larger than the padded pieces. This makes it easier to glue them on. Put glue on the front of the padded pieces (the side with the paper, not the bubble-wrap).You don't need to glue the whole piece, just a dab on all for sides will do, then stick them onto the back of the scrap paper. Trim the overlapping paper bits away, so the edges are all flush. 

Do the same for all your padded pieces.

3) Let the glued pieces dry (overnight is best, but at least 4 hours if you're in a hurry). This is so the glue doesn't make your sewing needle all sticky.

Time to sew. Set your machine to a zig-zag stitch (if you haven't got one on your machine, just go over it a few times). 
Place the front and back envelope pieces together, wrong sides (i.e bubble-wrap sides) facing each other. Turn it around so the shorter, back side faces you, and start sewing. You'll only need to sew around three sides, leaving the top open so you can slip your goodies in later. Backstitch a couple of times at the beginning and end, and at the corners of the envelope, to make it more secure.

4) Cut the hanging bits of thread off, and voila, you're done! Congratulations, young grasshopper, you've made a fancy little recycled envelope! Now go make more...

Tips and suggestions and other stuff - I made my envelopes fairly small (about 6 x 7 inches) but you can, of course, make yours any size you like/need. If you need a huge envelope, you can always just glue some scrap paper or newspaper all over it, and re-use it. 

I used some pages from a Toast catalogue for the example above, and some pages from a travel catalogue for the others. You can use any kind of paper you have laying around - newspapers, wallpaper, wrapping paper, whatever. If you're going to pop these into the post, it may be a good idea to leave the front fairly plain, and make the back a little fancier, so it's not too distracting for the postie. 

If you haven't got access to a sewing machine, or you're simply not up for abusing your machine like I do, you can always sew the sides up using a needle and thread. I think a nice blanket stitch would make it fairly secure, and you can use some yarn or embroidery floss for something a little fancier. It takes a little more time, but at least your sewing machine won't be making any angry noises.

Friday, 22 January 2010

Experiments With Purple

Made a fruit loaf using this recipe, but substituted frozen cherries, smoked prunes and a spoonful of blueberry jam in place of the bananas. I also used some vanilla soy milk and a tiny splash of ginger wine, instead of the coffee I used in the earlier recipe. The insides of the loaf were a lovely shade of purple, and it was great toasted, with some Nutella on top.

Red cabbage casserole, with grated cheese on top. Yes, it really was that violent shade of purple. May not be the prettiest dish around, but it was hella tasty.

Used a couple of leaves from the red cabbage to dye some white crochet cotton, and it came out this lovely shade of pale blue. My earlier experiments using vegetable matter to dye stuff can be seen here. I always get a little surprised when picking them out of the dye bath, as the colours are never really what I expect them to be.


Saturday, 12 December 2009

Christmas Tree

These were finished a couple of weeks ago, but I wanted to make sure the people they were intended for received them before I posted pictures.

The Christmas tree 'bracelet' is actually a wearable pincushion, for sewing on the go. Or just to wear if you want to feel like a Christmas superhero. I made two of these - one for my Mumsie and another for the Mancreature's Mama. They're very simple to make, and you should be able to whip one up in about half an hour, if you need some emergency stocking fillers or gifts. By the way, I'm sorry there aren't more 'process' photos, I didn't really think about making a tutorial until I'd finished them, then I was too hungry to make another one, with photos. Please don't give me lumps of coal for Christmas.

You'll need -
felt (in the colour of your choice)
embroidery thread (I used a matching green for the blanket stitch around the outside, and two strands of red and yellow for the stars)
stuffing (Polyfill, cotton wool, yarn or fabric scraps)
5 inches of elastic
scrap of fabric, about 8 x 4 inches (optional, you can choose to use pretty ribbon or lace and make the pincushion tie around the wrist instead) to enclose the elastic
paper stencil, in the shape of a tree (or any other shape you feel like making, I guess)


- Use the stencil to trace the shape onto the felt, then cut out two pieces, one each for the front and back. To make sure that both pieces are the same size, pin them together before cutting.

- Embroider some 'stars' on the front piece of felt. You can use a washable or disappearing ink pen (like this) to map out where you want the stars to be, but I just placed them randomly. I used cross-stitch for them, first in red thread, then going over those with the yellow thread.

*You can skip the next two steps if you're using ribbon or lace.
- Sew the long sides of your fabric (to cover the elastic) together, making a long tube, then turn it inside out so the stitching and seams are hidden. Put the elastic into the tube (I find it easiest to use a safety pin to guide the elastic through the tube). Pinch both of the elastic and sew them together, making a circular band.

- Ok, this is the part where I just jammed everything together, so...erm...
Sew the ends of the fabric tube together somehow, so you get a stretchy, fabric-covered 'bracelet'. Sew this bit to the back portion of the felt tree shape.

- If you're using ribbon or lace, sew it to the back of the felt tree shape as well, but you won't have to go through all that hassle with the elastic and all. You can leave the ends open so the recipient can tie it to fit their wrist. I should have thought of this when I was making my trees!

- Using the green thread, start blanket stitching around the top third portion of the tree, then stuff Polyfill (or whatever you're using) into the portion that's already stitched. Keep adding blanket stitches and stuffing alternately, until all the stuffing is inside. Knot the thread neatly and securely, then cut of the ends, and you're done! Wearable pincushion tree!

I also crocheted some heart shapes from thin metal wire to send to my family, so they could hang it on their tree. Although my sister tells me that they may not be having a tree this year, so I guess these ornaments won't be going up...

I don't actually have a tutorial for these, as the pattern isn't mine. I got the pattern for the hearts from here - I found her crochet hearts a lot prettier compared to most others (which are mainly made of of rows of single crochet - boring!).

All I did was string some beads onto thin copper wire, then crochet the hearts, and add a bit of yarn to the top for hanging. They didn't take too long to make either, although I found working with the wire very fiddly. You can always make it in nice yarn if you want to be kind to your fingers.


Tuesday, 8 December 2009

Upcycle Auction

Just wanted to let everyone know that all the items that are in Folksy's Upcycle Competition have now been listed on eBay, ready and waiting to be bid on! Get your fingers over to the Folksy blog for more information about the competition winners, or hop on over to the eBay shop that the Folksy team have set up.

And that reminds me - I haven't got around to showing you guys a picture of the last item I made for the competition. After knitting countless metres of icord, I then looped the resulting rope around several times, and attached it at one point with a small piece of fabric knitted in the same material. The yarn came from this baggy batwing jumper that I'd picked up from Sue Ryder Camden. Voila! A long, loopy scarf...made with 100% cotton.

Monday, 7 December 2009

S Is For...

a) Spiral bedsock - Started and finished my first sock (yes, just the one, for now) on the weekend. This spiral pattern is great for novice, nervous sock knitters like me, because there are no heel turns to fiddle around with. It's basically a cuff-down tube that's grafted together at the toes. The wonderous part is that the 3x3 spiral ribbing helps it fit your feet perfectly.

*Sorry for forcing my horridly misshapen feet in your face. I don't think I ever realized how freakishly long my second toe is. Sorry :(


The pattern comes from this trusty, obviously well-thumbed booklet (perhaps the best 50p I ever spent!). I did only one and three-quarter repeats, making them anklet-sized. While the instructions actually call for double-knit yarn, I decided to go with the much thinner sock yarn my sister recently sent to me. I also switched to 3.25mm needles instead of the recommended 4mm ones, and knit them in the largest size so they would fit.


b) Second - sock. Which I started this morning and hope to finish VERY VERY soon. So I can start on another pair of socks.


c) Sunny's blog - My awesomely talented friend Sunny has just started her blog, chockful of sexy ladies and crazy creative doings. Go check it out.
.

Thursday, 26 November 2009

MacGyver

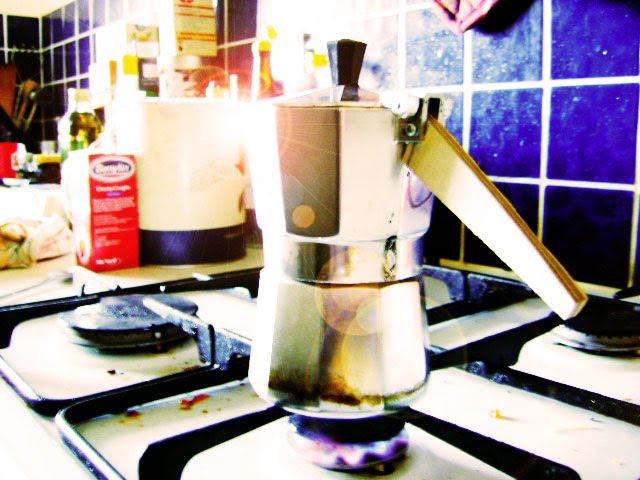
Once upon a time, three happy little bears in South London had a shiny little coffee doover that made the best little cups of coffee. That cute item cheered them up immensely in the mornings, to hear the water gurgling and the steam whistling as it escaped, bringing with it a rich scent of ground coffee beans. It really was one of the most pleasant ways to wake up every morning.

Then, one day, the little bear (who was very sleepy indeed that morning) went into the kitchen, as always, to make a cup of coffee, as always. This morning, however, she had unknowingly forgot to add a crucial ingredient before setting the shiny little doover on the stove. The plastic handle melted off after about 5 minutes, and she screamed a dismal 'Oh no!'
She'd forgot to fill the base of the doover with water, and the heat had got too hot to handle!

When the big bear came home, he had a laugh at little bear's silliness, then announced in his big bear voice 'I can fix it in the workshop!' The next morning, he ambled away to his workshop, broken doover in hand...and promptly forgot about it. It got buried under a pile of sawdust and sweat - out of sight, out of mind.

Last Tuesday, middle bear and little bear went to visit big bear in the workshop, and sported the sad little doover -no longer shiny now, but dusty - and excitedly exclaimed 'Oh, let's try and fix that!'  So middle bear and little bear both grab little offcuts of wood and started sawing, sanding and hammering. Little bear was contentedly sanding down a little piece of plywood when middle bear told her 'That's not going to work, it's going to take too long!' He them started bashing pieces of wood with a hammer. Little bear ignored him and carried on sanding, patiently.

About 15 minutes later (while middle bear was still bashing innocent pieces of wood), little bear took her nicely sanded piece of wood and held it up to the coffee doover. Lo and behold! It fit! Middle bear gave up hammering, and helped her fit it with a nut and bolt so it would stay.


They took it home, cleaned it up, and had nice fresh coffee the next day!

Ta-da! Action shot!
Little bear would also like to give thanks to the handsome and heroic MacGyver for the inspiration. She is certain that, were she to be trapped on a desert island with only a piece of twine and a toothpick for company, she would be able to construct an airplane to escape. She will attempt to make an explosive device using a week-old avocado tomorrow. Stay tuned for more exciting exploits from the three bears!

My hero!

Wednesday, 18 November 2009

Prowler


The weather's been fairly, well, London-ish recently, and all I've been wanting to do lately is stay in my PJs or wrap myself up in a blanket constantly. Which is all fine and dandy when I'm at home, but apparently, it's not the done thing when I'm out and about.

So I took matters into my own hands and whipped up a solution. I got one metre each of leopard print faux fur and a red/blue plaid flannel fabric (two of my favourite patterns!) and sewed up a reversible vest, with detachable (and reversible) hood. Can you tell I'm big on reversible items. No 'making-of' pictures, as I wasn't certain it would work. Didn't follow a pattern either, just cut and pinned and held my breath. And here's the end result.


I made the hood slightly bigger than usual, so it would go over my other hoodies or even hats. That way, I'll never need an umbrella. Stupid things are only useful if you want to poke someone's eyes out anyway.

Vest - DIY, black hoodie - some store in Hong Kong, blue flannie - KMart Boys section, t-shirt - hand me down from Hansen, jeans - opshop, beanie - opshop, bowler hat (2nd pic) - eBay

I premiered the vest last night on a supermarket run, and guess what? It's like wearing a blanket and PJs TOGETHER! Best thing ever! Expect to see lots of this little baby in the coming months...